Sometimes a guy needs to do some hard work to relieve his stress and to pass his time with amusement. When you do some physical works that require a lot of energy it helps to make you feel fresh.
So we have selected some DIY projects, especially for men. If you are a man and looking for some manly projects you can review these ideas.
In this post we'll cover:
4 DIY Projects for Men
1. Wooden Tool Box
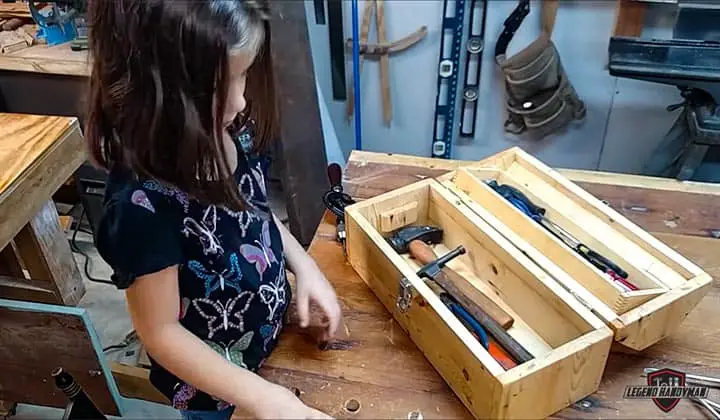
To carry a few tools around like a saw or two, a level, a few chisels an open-top wooden toolbox is a great solution. A toolbox generally requires a total of six pieces of wood which include a bottom piece, two side pieces, two end pieces, and a dowel for your handle.
You need the following materials for making the wooden toolbox:
- 6′ 1×10 clear pine
- 6′ 1×6 clear pine
- 2-4′ of 1 1/4” diameter dowel
- 35-40 1 1/4” #6 wood screws
- 1 1/4” auger bit
- 120-grit sandpaper
- Phillips screwdriver bit [ know what is the best screwdriver bit set ]
- Wood glue
- T-square
- Pilot drill bit and countersink for #6 screws
- Cordless drill or it could be a corded drill like one of these. Learn which one is the best corded drill.
- Bit brace
- Japanese pull saw
- Small block plane
- Wood putty (optional)
- Varnish (optional)
10 Steps to DIY Wooden Tool Box
Step 1
The first step is to collect clean boards of good quality. If the boards are not clean but the good quality you can also collect those and later clean those for your work.
Step 2
The second step is to determine the size of the box. Depending on your requirement you can make a box of smaller or bigger size but here I am describing my chosen size.
I have decided to make a box of 36’’ length since I have some tools of longer size like a handsaw, level, etc. I laid out the tools I wanted to keep in the toolbox to ensure they would fit in the box and I found that they fit nicely in the box.
Step 3
Square lumber is useful to work comfortably. So make it sure that your chosen lumber has square ends. Mark a fresh line an inch with a pencil using a t-square from the ends of the board and trim off the part.
Step 4
I already have mentioned that I have decided to make the box 36’’ long and so the interior dimension should also be 36’’ long. I cut the sides also 36’’ long so that the bottom and the side parts can be capped by the end parts properly.
Then mark and cut the two pieces of 1×6 and a single 1×10 with your square and cut those pieces.
Step 5
Now take a measurement of 6 1/4” from the bottom part of your 1×10 and mark that spot on both sides of the board using the pencil and ruler. Then cut the piece along the marked line.
Now take a measurement of 11” from the bottom edge of the board and using the combination square find out the midpoint and mark it with the pencil.
Make an arc of 2’’ with your compass. You have to set the compass to a 1’’ radius to make an arc of 2’’. Then place the point of the compass on your 11” mark draw a circle.
Now you have to connect the mark at 6 1/4” with the tangent of the arc you created with the compass. Repeat this step for the other side also.
Now you have to draw one more circle by placing the point of the compass on the 11” mark. This time the radius of the circle will be 5/16”. This circle has been drawn to mark a 1 1/4” hole. After that using a pull saw cut the piece out.
You just have to make a big point and do not have to follow the curve. Then you will find that the piece has been loosening. Then trim the board square and repeat the process again.
To save you time later when you are smoothing the end trim the tip off the triangle as close as you can to the line.
Then using brace and bit drill the hole for your handle. After that using a rasp clean up the top of the side pieces and make the rasping end.
Repeat the whole process for the second end part. You can use the first part as a template for the second part.
Step 6
Now you have to attach end pieces to the bottom board. I was needed a total of 5 screws to attach the end pieces with the bottom piece.
Then applying some wood glue to the end part of the bottom board line up the bottom with the end piece and tap with a hammer to set them, make sure you are suing Framing hammer! Just kidding.
The end pieces and bottom piece should remain perpendicular to each other and repeat the steps for the opposite side.
Step 7
Dry-fit the side pieces in place and trim if necessary. Now to drive the screws into the side pieces drill and countersink a few holes in the end pieces.
Step 8
Now you have to attach the dowel by placing the dowel through the two end pieces. Then drill and countersink one hole in the top portion of the end piece on each side. Then drive a screw into the end piece and the dowel.
Step 9
Then fasten the bottom piece to the side pieces and relieve the side edges.
Step 10
To make the box smooth using 120-grit sandpaper sand it and you are done.
2. DIY Mason Jar Chandelier
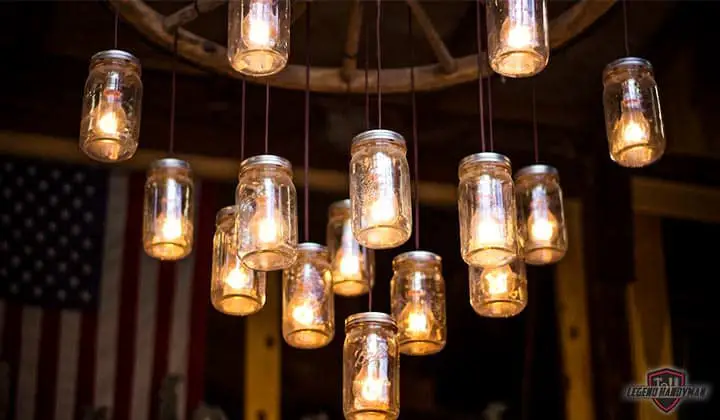
You can make an awesome chandelier with the unused mason jars. You need the following materials for this project:
- 2 x 12 x 3(ish) African Mahogany
- 3/4 inch maple plywood
- 1/4 inch ply
- 1×2 birch
- 3 – 7 contact grounding bars
- 14 gauge Romex
- Minwax Espresso Stain
- Rustoleum Chalk Board Paint
- Kerr Mason Jars
- One Large Pickle Jar
- Westinghouse Pendant Lights
- wire nuts
Now check your toolbox whether the following tools are there or not:
- Skil corded hand drill
- Hitachi 18v cordless driver
- Skil direct-drive Circular Saw
- Ryobi 9 inch Band Saw
- Kreg Jig
- Kreg square driver bit
- Kreg 90 degree clamp
- 1 1/2 inch coarse-thread Kreg Screws
- 1 1/4 inch coarse-thread Kreg Screws
- 1-inch course thread Kreg Screws
- Dewalt trigger clamps
- Spring Clamps
- C Clamps & the best brands to buy”>C Clamps
- Wire Stripper/Clipper
- Dewalt 1/4 drill bit
- Dewalt 1/8 drill bit
- 3M Blue Tape
- Gardner Bender Spray Liquid Electrical Tape
5 Steps to DIY Mason jar Chandelier
Step 1
At the initial stage, you have to trace the size of the fixture on the top of the mason jars and then cut out the holes.
Step 2
Now twist the upper part of the mason jar where you have cut the hole including the outer ring onto the fixture so that you can remove the ring from the end of the fixture.
Then return the black ring to the bottom part of the lid and twist it so that the lid remains secured to the fixture.
Step 3
Then put the Minwax Espresso Stain on the Mahogany wood. Wait for 10 minutes before wiping wipe the excess off to get a beautiful finish.
Step 4
You have to make a path to allow excess heat to escape and so drill some vent holes.
Step 5
Mark points where you would like your jars to go and drill holes in the marked areas. You have to make those large enough to fit the cords through.
Then thread the wires from the top part into the box and pull through. Finally, measure the length that you want each light to hang. And your project is complete.
3. DIY Headboard from Pallets

You can make a headboard on your own and add it with your bed to make it unique. It is a perfect project for men to enjoy. You need the following tools and materials for this project:
- Wooden pallets (2 8ft or 2×3’s pallets are enough)
- Nail gun
- Measurement tape
- Screws
- Linseed oil or stain
- Sandpaper
6 Steps to DIY Headboard from Pallets
Step 1:
For any kind of wooden project, measurement is a very important task to be fulfilled. Since you are going to use the headboard for your bed (you may use it for any other purpose also but most of the time people use headboard in their bed) you must take the measurement carefully so that it matches with the size of your bed.
Step 2:
After cutting the pallets into small pieces you need to clean the pieces properly. It is better to wash the pieces for better cleaning and after washing do not forget to dry in the sun. The drying should be done with good care so that there remains no moisture before going to the next step. Do it using a quality wood moisture meter.
Step 3:
Now it is time for assembling the dismantled wood. Use the 2×3’s along the width of the frame and between 2×3’s use 2×4 pieces for providing structural support to the headboard.
Step 4:
Now open your toolbox and pick up the nail gun from there. To secure the assembly you need to drill holes and add screws to every connection of the frame.
Then attach slats to the front part of the frame. The critical work of this step is cutting the small pieces in an alternating pattern and at the same time, you also have to maintain the length accurately to span the headboard.
You may wonder why the alternating pattern is necessary. Well, the alternating pattern is necessary since it gives a rustic look to the headboard.
Once this work is finished take the slats that you have recently made and attach those using the nail gun.
Step 5
Now notice the edge of the headboard. A headboard with open edges does not look good. So you have to cover the edges of your headboard. But if you prefer en exposed edges you can skip this step. I personally like covered edges and those who like covered edges can perform the instruction of this step.
To cover the edges take the proper measurement of the height of the headboard and cut 4 pieces of the same length and screw those pieces together. After that attach those to the headboard.
Step 6:
To make the look of the whole headboard uniform or to bring consistency in the look of the headboard add linseed oil or stain to the edges.
You may wonder why we are recommending to use linseed oil or stain only to the edges, why not the whole body of the headboard.
Well, the cut edges of the headboard look fresher than the body of the headboard and here comes the question of consistency in color. That is why we recommended using stain or linseed oil to bring consistency in the look of the whole headboard.
Finally, to remove the hard edges or burs you can now sand the headboard with sandpaper. And, the headboard is ready for attaching to the frame of your bed.
4. DIY Coffee Table from Unused Tire
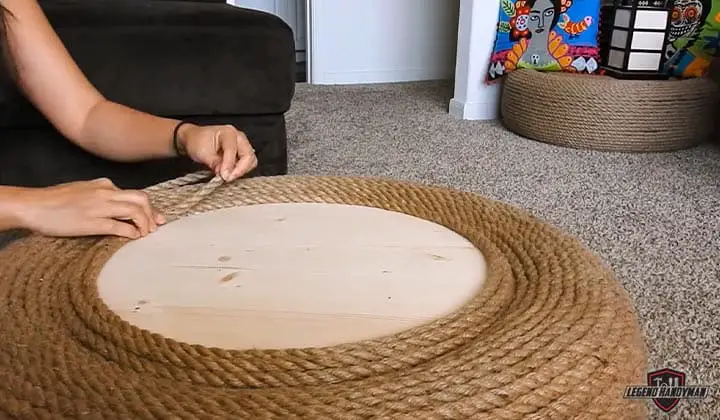
The unused tire is an available material that you can convert into a beautiful coffee table. You need the following tools and materials to convert an unused tire into a coffee table:
Required tools:
- wrenches/sockets
- screwdrivers
- sanding block
- hammer / pink hammer
- mallet
- pencils/markers
- hand plane
- table saw
- drill press
- band saw
- lathe
- router (table mounted) / Trim router / Plunge router
- router (handheld)
- belt sander
- disc sander
- jigsaw
- drill
- impact driver | How to choose the best tool for you”>impact driver
Required Materials
- old tire
- 1/2 sheet plywood
- assorted wood screws
- three lag screws
- threaded rod
- assorted washers
- stain or paint
If you have all the required tools and materials in your collection you can go for the working steps:
4 Steps to DIY Coffee Table from Unused Tire
Step 1
The first step is cleaning. To clean the tire properly wash it with soapy water and dry it under the sun.
Step 2
Then you have to decide the layout of the coffee table. I personally like the tripod. To make the tripod I have divided the tire into three even sections. Here comes the question of measurement. You can get a good idea of measurement for dividing the tire into 3 even sections from the following video clip:
Step 3
After you have laid out the thirds on the inner rim of the tire, to transfer the marks to the opposite side using a square.
Then drill a hole for the support rods. Since the tire is made of rubber material you will notice that rubber cannot retain its shape when drilled. So I will suggest you use at least a 7/16″ bit for a 5/16″ threaded rod.
Another important information to be noted that you have to go slowly during cutting and drilling so that too much heat cannot build-up.
Now through the holes insert the threaded rod. The rod should be long enough to accommodate a nut, lock washer, and flat washer on each end. A 3/8’’ long rod is good to get the floor supports on later.
If you notice that the round washers pulled on the sidewall of the tire making a weird tension line clip the flat washer so that it cannot dig into the sidewall.
Now you have to make the leg holes by drawing the division lines out onto the sidewall. Using a hole saw I have drilled leg holes that are halfway between the bead and tread.
I have used a lathe machine for making holes. To provide the support I have used MDF.
Step 4
Then I have inserted the legs, secured it with screws and reunited all the parts of the table and attach the top portion of the table. And the work is done.
Wrap Up
All of the projects are the length and requires a lot of energy. You also have enough skill and knowledge about the use of different hand tools and power tools.
Since the projects are designed for men we have selected those projects that require high energy. Hope these projects will help you to relief your stress and get relaxed.

I'm Joost Nusselder, the founder of Tools Doctor, content marketer, and dad. I love trying out new equipment, and together with my team I've been creating in-depth blog articles since 2016 to help loyal readers with tools & crafting tips.