I love creating free content full of tips for my readers, you. I don't accept paid sponsorships, my opinion is my own, but if you find my recommendations helpful and you end up buying something you like through one of my links, I could earn a commission at no extra cost to you. Learn more
Skilsaw is a brand that largely dominates the circular saw marketplace. The widespread popularity of this company results in many people naming a circular saw as a Skilsaw, sort of how you call a photocopier a xerox machine. This, however, is a misconception.
But regardless of the quality and efficiency of the circular saw by the brand, it suffers from the common problem present in any tool of this design, the blade. Like any other circular saw on the market, the blades of a Skilsaw require replacing from time to time.
If you are having trouble with this simple task, this article is for you. In this article, we will show you a step-by-step guide on how to change the blade on your Skilsaw circular saw.
On a side note, when it comes to using a Skilsaw, there are things that you need to know. You also need to practice using one because unlike most other saws out there, this one has a bit of a learning curve.
In this post we'll cover:
How to Change the Blade on Skilsaw Circular Saw | Step to Follow
Here are the simple steps that you need to follow when you are replacing the blade of a Skilsaw circular saw Step 1 The first step is to ensure there is no power running to the Skilsaw. If it is battery-powered, make sure you have the batteries removed. In case you are using an electrical unit, unplug it from the wall socket.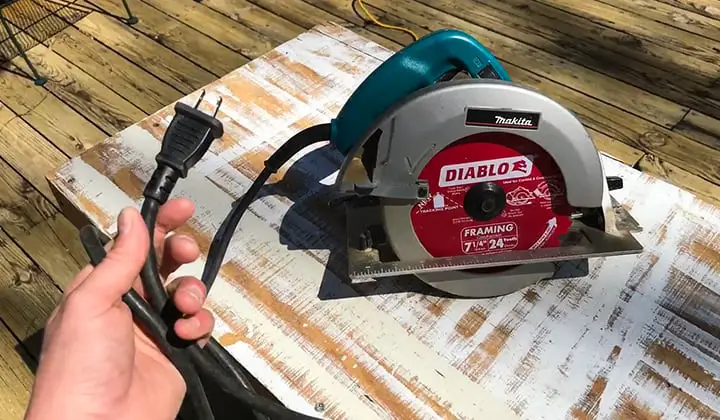

How Frequently Should I Replace the Blade on a Skilsaw Circular Saw?
The answer to this question depends on a couple of factors. For instance, if you use this tool sparingly, once every other week, then it might be quite a while before you need to think about replacing the blade. On the other hand, for a heavy-duty user, the blades might require regular replacing. The telltale sign of when you need to replace the blade is generally any type of wearing on the blade or burn marks on the wooden material that you are cutting. Once a blade is dull, you will also notice that it will cut slower, and the motor is working harder to cut through the material. Another key reason to replace the blade is if you are cutting something that requires a particular type of blade. There are a few different types of blades that you can buy for a Skilsaw, such as a crosscut blade or a rip-cut blade. If you are replacing the blade due to the specialty of your project, the good news is that you do not necessarily need to get rid of the old one. Since changing the blade on a Skilsaw circular saw is relatively fast and easy, you can easily swap out blades as your project requires.
Tips and Tricks on Using the Skilsaw Circular Saw
Now that you understand how to change the blades on a Skilsaw circular saw, here are a couple of general tips and tricks that you should know regarding this device.
- Make sure you wear safety gloves when you are handling the blade of a Skilsaw. Even dull blades have enough bites to them to cut through your skin.
- By using oil regularly, you can get a better lifespan out of your blade. Remember to periodically sharpen the teeth to improve the efficiency of your device while cutting through materials
- Make sure you give the instruction manual a thorough read before you start handling your device. The owner’s manual comes with all the information you need regarding the power saw and can often give you specific instructions that you need to follow to replace the blade.
- Check for a blade release switch on your Skilsaw before doing any of the above steps. Some models come with this handy button that makes swapping out blades extremely simple.
- While replacing the blades, it is often a good idea to give your machine a thorough scrubbing. With the blades off, you can reach the blade guards easily.
- After replacing the blade, do not start using it right away. Always do a test run first to see if the blade is seated correctly. While running the test, make sure you take all the proper cautionary steps and keep the saw as far away from you as possible.
- You can also follow the Essential Craftsman channel of YouTube. That guy really knows how to use a Skilsaw. I would go as far as to say he is the master of this tool. The tips he shows are just mind-blowing. If you are a beginner, make sure to follow his channel. It is amazing that he still has all of his fingers intact.
Final Thoughts
Although changing the blades on a Skilsaw circular saw might seem like a chore, the task is actually quite simple. With all the information that you got from our article, you should now have no trouble replacing the blade when it gets dull or swapping out between a crosscut or a rip-cut blade. We hope our extensive guidelines could be of some assistance to you and any of your projects.
I'm Joost Nusselder, the founder of Tools Doctor, content marketer, and dad. I love trying out new equipment, and together with my team I've been creating in-depth blog articles since 2016 to help loyal readers with tools & crafting tips.