In the world of saws, a circular saw is an infamous tool for making angular cuts. While its nearest competitor, the miter saw is very effective for making miter cuts, the circular saw is at a level of its own when it comes to making bevels. It is something that makes cutting angles fast, safe, and most importantly, efficient.
However, many amateur woodworkers struggle with a circular saw. To ease that struggle and provide you an insight into the tool, we have come up with this guide. We will show you the proper method of cutting a 45, 60, and a 90-degree angle with a circular saw and share with you some handy tips and tricks along the way.
In this post we'll cover:
Circular Saw for Cutting at Angles | Required Parts
You may have little to no experience with a circular saw, but when you are about to cut different angles with it, you must know about some markings, notches, and levers. Without a proper understanding of these, you simply can’t begin cutting angles with a circular saw.
Angle Lever
Around the front-left or the front-right of the blade of a circular saw, there is a lever that sits on a small metal plate with markings from 0 to 45. Dial the lever to make it lose and then move it along the metal plate. There should be an indicator attached to the lever which points at those markings.
If you have never changed the lever, then it should be pointing at 0. That means that the blade of the saw is at 90-degree with the base plate. When you point the lever at 30, you are setting an angle of 60-degree between the base plate and the blade of the saw. You need to have this knowledge in mind before you proceed to cut different angles.
Markings on the Base Plate
At the frontmost part of the base plate, there are different markings. But there is a small gap near the front of the blade. There should be two notches on that gap. One of the notch points to 0 and the other points to 45.
These notches are the direction that the blade of the circular saw travels along while spinning and making a cut. Without any angle set on the angle lever, the blade follows the notch pointing at 0. And when it’s set at an angle, the blade follows the 45-degree notch. With these two things out of the way, you can now start making angles with the saw.
Precautions
Cutting woods with a circular saw produces dust and a lot of sounds. When you are doing this for a long time, make sure that you wear safety goggles (like these top choices) and noise-canceling headphones. If you’re a beginner, we strongly suggest you to ask an expert to stand by your side and guide you.
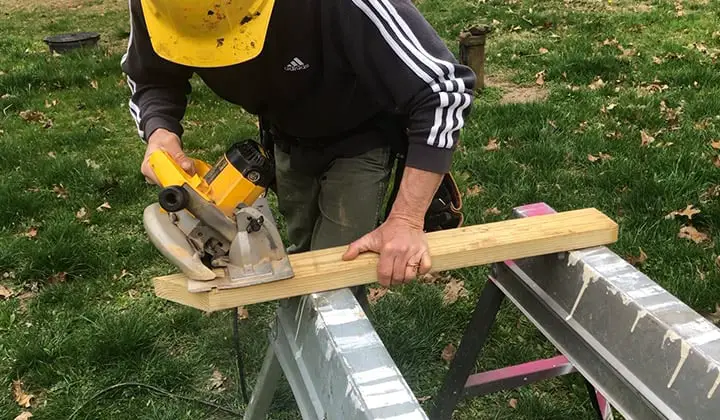
Cutting 90 Degree Angle with a Circular Saw
Take a look at the angle lever near the front of the circular saw and see what marking it points to. If required, loosen the lever and point the marker at the 0 marks on the label plate. Hold both the handles with two hands. Use the rear handle to control the spin of the blade using the trigger. The front handle is for stability.
Place the tip of the base plate on the piece of the wood that you wish to cut. The base plate should sit perfectly level on the wood and the blade should point exactly downwards. Without making contact with the wood, pull the trigger and hold it there to take the spin of the blade at maximum.
Once the blade is up and running, push the saw towards the wood. Slide the base plate of the saw across the body of the wood and the blade will cut the wood for you. When you reach the end, the part of the wood that you just cut will fall off on the ground. Release the trigger to bring the saw blade at rest.
Cutting 60 Degree Angle with a Circular Saw
Observe the angle lever and check where the marker points on the plate. Just like the previous one, loosen the lever and point the marker at 30 marking on the plate. If you understood the angle lever section previously, you will know that marking the lever at 30 sets the cutting angle at 60degree.
Set the base plate on the target wood. If you’ve set the angle correctly, you will see that the blade is slightly bent inwards. Then, just like the previous method, pull and hold the trigger on the rear handle to start the spinning the blade while sliding the base plate across the body of the wood. Once you reach the end, you should have a nice 60degree cut.
Cutting a 45 Degree Angle with a Circular Saw
At this point, you can pretty much guess what the process of cutting a 45-degree angle would be. Set the marker of the angle lever at the marker 45. Don’t forget the tighten the lever once you’ve set the marker at 45.
Placing the base plate on the wood with a firm grip of the rear and the front handle, start the saw and slide it inside the wood. There’s nothing new to this part other than sliding it towards the end. Chop the wood off and release the trigger. That’s how you will get your 45-degree cut done.
Conclusion
The whole process of cutting wood at different angles with a circular saw can be tricky at first. But when you get comfortable with it, it will be easy for you and you can add different methods of your own to cut different angles.
If you are in a fix about the 30 degrees marking translating to a 60-degree cut, just remember to subtract the marked number from 90. That’s the angle you are cutting at.
And don’t forget to wear the best woodworking gloves, best safety glasses and goggles, best work pants, and the best ear muffs for the protection of your hands, eyes, legs, and ears. We always encourage to buy the best tool and the best safety gears to provide you the best service and to ensure complete security.
You may like to read – best miter saw stand

I'm Joost Nusselder, the founder of Tools Doctor, content marketer, and dad. I love trying out new equipment, and together with my team I've been creating in-depth blog articles since 2016 to help loyal readers with tools & crafting tips.