Even the hardest bits will inevitably become dull with time. This means that they will need to be sharpened when needed. It is human nature to push a drill harder when the bit wears down, which leads to bits breaking and can even result in personal injury.
Have you ever thought about sharpening your drill bits? Following just a few easy steps will help you sharpen every drill bit. Thus, the material will remain efficient and flaws will not be evident. The right tools will, however, be needed for sharpening bits.
Sharpening drill bits yourself requires knowing a few things about the different types, the best processes, and the most appropriate tools. Today, we’re going to be talking about all this.
In this post we'll cover:
- How to Sharpen Drill Bits by Hand
- Five Different Drill Sharpening Methods
- 10 Effective Tips for Sharpening Drill Bits
- 1: Know Your Drill Bit Well
- 2: Examine the Dull Bits Properly
- 3: Choose the Sharpening Machine
- 4: Wear Your Goggles
- 5: Do Not Remove More Metal than the Necessity
- 6: Dip the Drill Bit into Ice Water
- 7: Give a Test Run
- 8: Pull Out the Flakes or Chips
- 9: Make a Habit of Stop and Cool Technique
- 10: Keep Two Complete Sets of Drill Bits
- Final words
How to Sharpen Drill Bits by Hand
If you are thinking about hand sharpening your drill bits, here are a few handy tips to help you.
What You Need
- A bench grinder with fine and coarse grinding wheels. As an alternative to a grinder, you can use a belt sander (some of these are perfect).
- Any work that involves sparks or thin slivers of metal requires safety goggles (like these). It’s important that you stay protected since you will be close to the action.
- You may choose to wear gloves if you wish. Often, gloves cause you to lose your grip, so make sure they fit well in your hands if you like to wear them.
- To test how sharp your drill bit is, use some scrap wood.
- Drill bits tend to overheat, causing them to become duller. Avoid overheating the drill bit with a bucket of water.
Process of Sharpening Drill Bits
1. Separate the Blunt Bit
The first step is to identify the dull drill bit that needs attention and separate it from other sharp drill bits. To achieve a sharp edge, you should focus on removing as little metal as possible.
Start by grinding the worst drill bits over the coarser wheel, then progress to finer wheels.
Also read: these are the best drill bit sharpeners you can buy
2. Grind the Edges
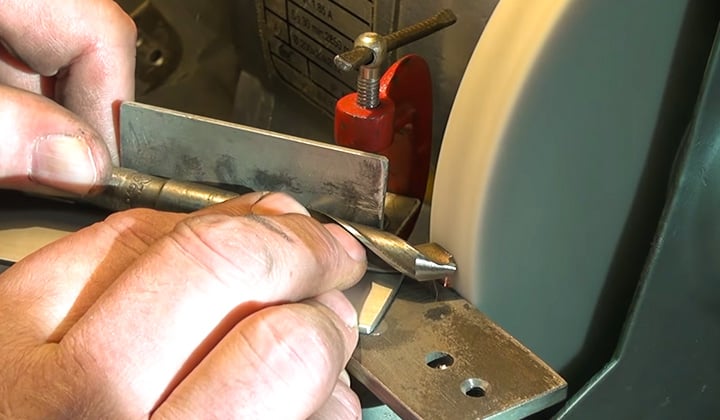
Make sure you have your goggles on. To ensure smooth grinding, turn the grinder on and position the drill bit parallel to the wheel. Now, gently press the grinder against the unwanted metal and let it be smooth. Don’t rotate it, and keep it still. Thus, aim for a 60-degree setting similar to that found in the factory.
3. Don’t Overdo It
No more than five seconds should pass between the drill bit and the grinder. Overdoing it at one time may lead to damage to the drill bit. For the best result, when sharpening the twisted shaft, point it where the shaft meets the tip- not the edge.
4. Dip the Bit in Cold Water
Make sure you always keep a bucket of cold water handy when you are sharpening your Makita drill bit. Without that, you will risk burning your hands if you do not cool the drill bit.
Dip the drill bit in water after grinding for four or five seconds to cool the metal. Drill bits that do not cool properly may become too hot to hold and might even wear out the metal faster.
Furthermore, when it becomes hot, its sharpness decreases. Now, check that it has a well-honed cutting edge after taking it out of the water.
5. Do the Other Side
Repeat the same process on the other side if you are satisfied with the first face. It is important to center both cutting surfaces of the bit, so they meet each other.
To achieve an accurate and desirable result, it is necessary to balance the drill bit every few seconds when honing. Consider that you are sharpening a knife on a block by working each side and then the other. With a drill bit, the process is the same. In addition, you should aim to achieve the best results with a 60-degree angle.
One method some people use so that their drill bits are sharpened equally on both sides is to sharpen one side at a time, holding the drill bit in one hand and rotating it 180 degrees after every few seconds.
5. Hand Turn the Bit in a Dry Run
If you are satisfied with the sharpness and balance, you can test the bit on a dry run. Take the bit and hand-turn it into a piece of scrap wood. If you find the bit cuts into the wood even with only a little pressure, you have done well.
On the other hand, if that’s not the case, keep grinding until you achieve the finish you’re looking for.
7. Use Your Drill to Test It
If both edges of the drill tip are sharp and both edges have the same width, it is time to test the drill bit. Press the drill bit into scrap wood. You will know you have succeeded when you feel the drill starts biting straightaway. If not, consider going back to the grinding wheel and reexamine.
You won’t get better by only going around the wheel once- so don’t get disheartened if it takes several times.
Five Different Drill Sharpening Methods
1. Using an Angle Grinder
Angle Grinder- One of the easiest ways to sharpen a bosch drill bit. However, you will probably need to buy a woodworking jig to facilitate your job. or you can make one yourself, simply drill a hole into a scrap piece of wood as per the angle of the drill’s point. For example, if your point angle is 120 degrees, you should draw a line on wood that is 60 degrees and drill through it.
Place the bit on the bench after attaching it to the jig. While applying pressure against the hole, hold the bit with your hand. Afterward, hold the angler by hand, making sure the bit is parallel to the surface of the wood, and switch it on. To sharpen the land, apply pressure against the bit and flip it every few seconds. Press the bit against the bench vice to sharpen the reliefs after removing it from the jig.
2. Diamond Files
If you prefer something that doesn’t require electricity present, here is your drill sharpener.
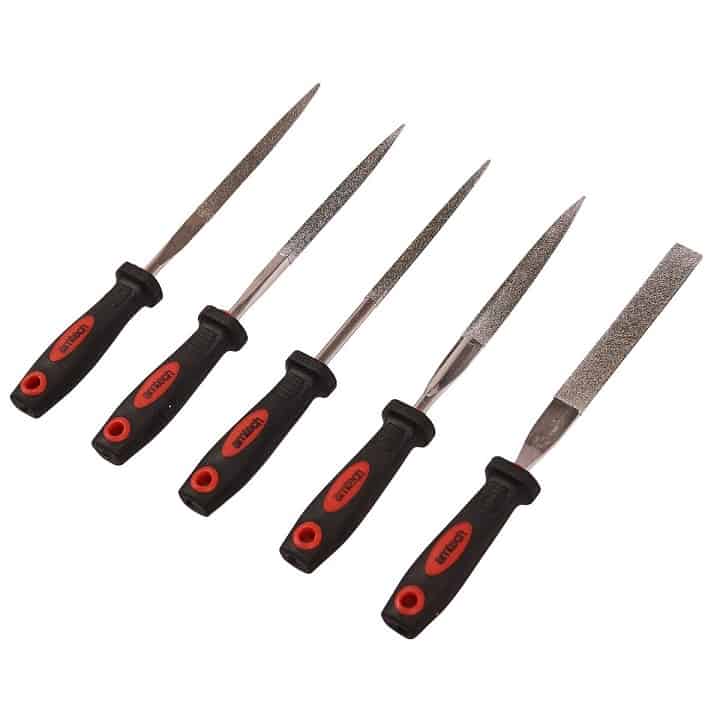
When sharpening your black and decker drill bits with augers or pilot screws, diamond files are particularly useful and require no electricity. To sharpen bits without damaging them, it is very popular among carpenters to use a diamond needle file.
Generally, hand filing requires more time than traditional power sharpening tools. However, the only way to maintain the delicate bit of the pilot screw from being damaged is to use a diamond file. As a bonus, if you use a diamond file, it is easy to sharpen drill bits. Whenever you’re far from your power tools, you’ll need this tool. And it is quite affordable.
3. A Drill Doctor Drill Bit Sharpener
Drill Doctor Drill Bit Sharpener arguably is one of the most accurate drill bit sharpener tools available on the market right now. The price is indeed quite high, but the dedicated sharpening tool offers precision sharpening.
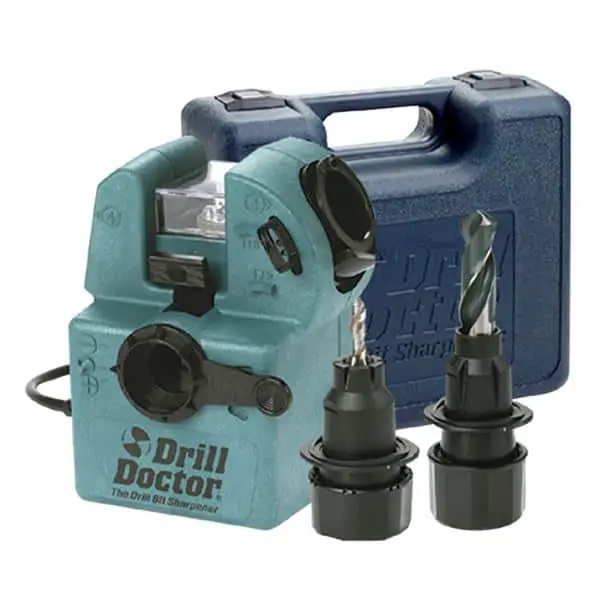
Like other sharpening tools, there is no way to cool the bit by dipping it in water when using a Drill Doctor. Therefore, you may lose the structural integrity of the Ryobi drill bit if you sharpen it too quickly. Additionally, it is only capable of sharpening bits. When it comes to sharpening knives and scissors, consider buying a combination unit.
Drill Doctor sharpeners use fine grinding stones like most commercial sharpeners. Despite being useful for maintaining smooth edges, metals are difficult to remove with them. Consequently, sharpening very dull bits takes longer.
4. Using a Bench Grinder
Bench grinders are among the most efficient ways to sharpen drill bits. You likely have one already if you’re a DIYer. Sharpening is as easy as strapping on some protective clothing and getting started. Fortunately, with light use, the sharpening stone doesn’t wear it out too much.
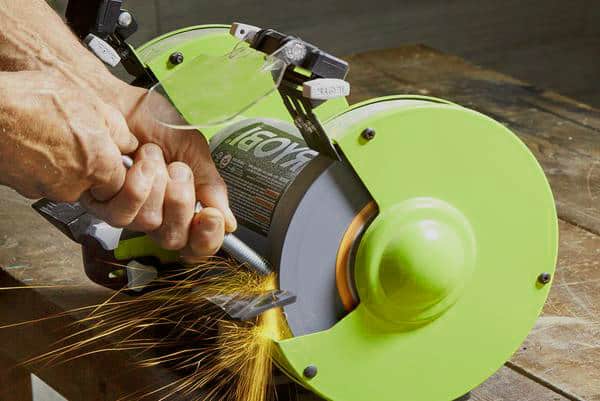
Two sharpening wheels are typically included with bench grinders. They are coarse and fine, respectively. You should start sharpening with the coarse wheel, then move to the fine one to finish. You can maintain the bit’s structural integrity by immersing it in the water more than once to keep it cool. The cold water next to the tool also protects the bit’s finish.
A little practice is necessary, however, for freehand sharpening. So, if you cannot achieve the same level of precision as with a dedicated sharpening tool, don’t get discouraged. Moreover, taking a risk like getting too close to a rapidly spinning grinding stone is not something that everyone is comfortable doing.
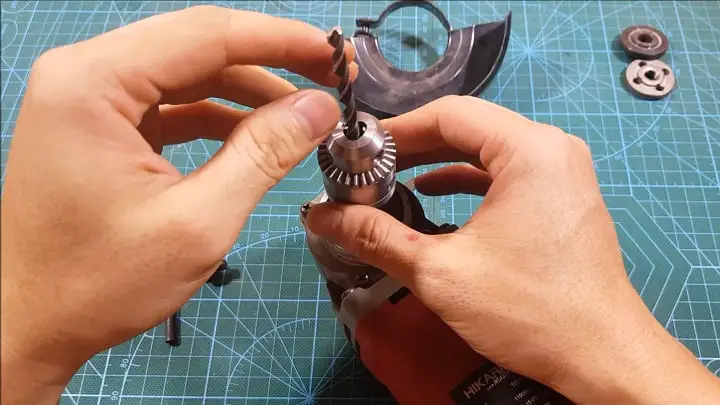
5. Using a Drill-Powered Bit Sharpening Tool
The cheapest way to sharpen drill bits is by using a drill-powered bit sharpener. Even though you will pay much less for it than you would for dedicated sharpening tools, the results you will get will likely be as good as those.
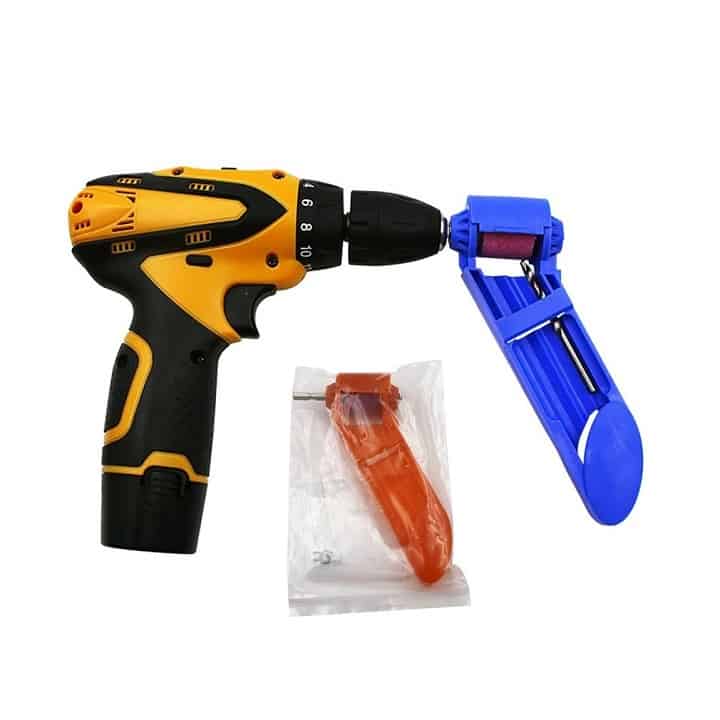
With around $20, you can get a small, wireless, and importantly easy-to-use sharpening tool. As a bonus, you can use it without being near your workbench, and it takes very little time to set up.
When you sharpen a bit, you should cool it until it is nice and cool. This will help keep the cutting edge sharp for a longer time. A spray bottle can either be used to dampen the bit or dip it in water. Thanks to the fine grinding stone in a drill-powered sharpener, it’ll keep your bit’s end smooth. The process of grinding through a well-worn bit, however, will take longer.
The main disadvantage of this kind of sharpener is that it can only handle a limited number of bits. They tend to sharpen bits that are smaller than half an inch. In addition, it might seem difficult to use as you have to hold the tool firmly in place and position it correctly to achieve accuracy. Although sharpening wheels cannot be replaced, buying a new tool costs nearly the same as replacing a sharpening wheel.
10 Effective Tips for Sharpening Drill Bits
You need bench grinder or belt sander for sharpening the dull drill bits. But a drill bit sharpener may the best tool to sharpen a drill bit. You also need to wear some safety gears for safety purpose which include:
- Safety Goggles
- The container of Ice Cold Water
Caution: Sometimes people wear hand gloves but wearing hand gloves is risky in this case because they can get caught into the sharpening device and pull you in.
1: Know Your Drill Bit Well
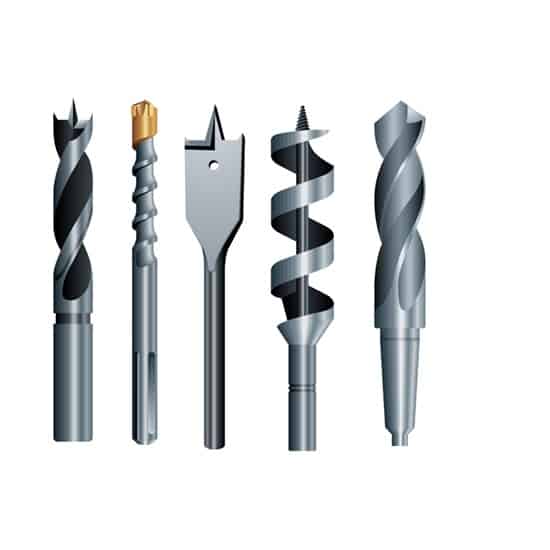
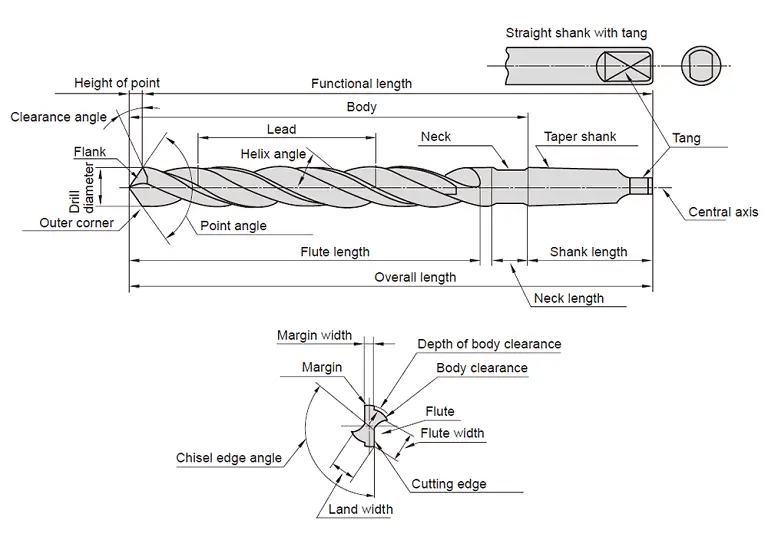
It is very important to know your drill bit well before you start working on it. A drill bit has many features but for sharpening purpose 3 features are most important and these features include- lip, land, and chisel. So, let me give you a clear idea about these 3 important features-
Lip: Lip is the place where the actual cutting is done. Twist bits are the most commonly used drill bits and it has a pair of lips. Both lips should sharpen equally. If one lip is sharpened bigger than the other then most of the cutting will be performed on one side of the drill bit.
Land: landing is the part that follows the lip and it provides support to the sharp edge. The landing needs to be angled in such a way so that it leave clearance between the part of drilling and the lip.
Chisel: It is not a true chisel. When the landing from both sides of the twist drill intersects chisel is created. When you turn the drill and force down into the workpiece the chisel slurs the wood or metal. That is why the chisel portion should be kept small.
Along with I like to add that, learn what is the drill bit used for?
- Is it the drill bits for wood?
- Is it the drill bits for porcelain tiles?
- or is it the drill bits for aluminum?
- or is the drill bits for glass?
- or is it the drill bit for concrete? or for what?
2: Examine the Dull Bits Properly
Before start sharpening, you should examine your drill bits properly. Your drill bits may get chipped or may get dull.
If the landing force behind the drill bits cannot support the forces exerted by the drilling operation the drill bits get chipped. On the other hand, if the chisel is having trouble smearing the material to the lip or the lip is rolling over it is dull.
3: Choose the Sharpening Machine
You can choose a bench grinder or a belt sander for sharpening the drill bits. Some bench grinders have a pair of grinding wheels – one is coarse and another is a fine wheel.
If your bits are ravaged we will recommend you to start sharpening with the coarse wheel and then switch to the finer wheel for final processing. On the other hand, if your bits are not in a very bad condition you can start with the finer wheel.
Also, there are some cool drill bit sharpener available, you also could check them too.
Caution: Before starting the operation make it sure that the guards on your chosen machine are less than 1/8″ away from the belt or wheel; otherwise your bit may get caught between the guards.
4: Wear Your Goggles
Wear your goggles and turn on the machine. Holding the drill bits firmly keep the cutting edge parallel to the front of the grinding wheel carefully and slowly move the bit until it comes in contact with the wheel.
Do not do the mistake of turning or rotating the wheel. Simply held it at an angle of 60 degrees and start cutting the edge precisely.
5: Do Not Remove More Metal than the Necessity
Your goal is to remove only enough metal to get a sharpened edge. If you remove more than this the bit will wear down. So, do not hold the bit against the wheel for not more than 4 to 5 seconds.
6: Dip the Drill Bit into Ice Water
After 4 to 5 seconds give a pause and dip the hot drill bit into icy water. If you do not do so, the drill bit will become hotter and wear down faster which will reduce the effective life of the drill bit.
When it becomes cold, inspect it properly to check whether the side you have just worked is honed to a good point or not. If you are satisfied with the first side to turn the drill bit at a 180-degree angle and repeat the same steps you have just performed i.e. grinding and cooling.
7: Give a Test Run
If both edges are sharpened at the same width give a test run by holding the tip of the bit at the perpendicular position against a piece of scrap wood and twist the bit by hand.
If the bit is sharpened well it will start creating a hole even with light pressure. If you notice that your bit cannot start creating a hole, it means the bit is not sharpened well. So, again repeat the previous process and eventually, it will come to your expected position.
8: Pull Out the Flakes or Chips
It is a good practice to pull out the flakes or chips for every inch you drill. If you do not do so, your bit will become hot by getting packed into the chips which will reduce the longevity of it.
9: Make a Habit of Stop and Cool Technique
After every few inches of drilling dip the hot drill into cold water. This habit will increase the life expectancy of the sharp tip of your drill bit, otherwise, it will get dull soon and you have to sharpen it frequently.
10: Keep Two Complete Sets of Drill Bits
It is a good practice to use one set of drill bits to start a hole and to use another set for completing the hole. This practice will let you use the sharpened drill bit for a long time.
Final words
On one hand, drill bit sharpening by hand is an art form that takes a lot of time and effort to learn, even though it is certainly useful. On the other hand, with a power tool like a drill doctor, you can easily complete your task and get the job done with ease.

I'm Joost Nusselder, the founder of Tools Doctor, content marketer, and dad. I love trying out new equipment, and together with my team I've been creating in-depth blog articles since 2016 to help loyal readers with tools & crafting tips.