People sometimes confuse upcycling with recycling. Recycling is to turn one thing into another whereas upcycling is upgrading something into the more prettier and stylish thing.
Yes to decorate your home, to meet your need you can buy something fancy or expensive but if you upcycle any existed product to meet your need you will be benefitted in so many ways like you can develop a new skill, making something by your own will give you pleasure, reduce cost and show the uniqueness of your thought.
We have enlisted 7 upcycling project idea for your home that is easy and quick to accomplish. I will not waffle more, let’s go to the project.
In this post we'll cover:
7 Gorgeous Up Cycling Project
1. Turn Your Mason Jars into Pendant Lights
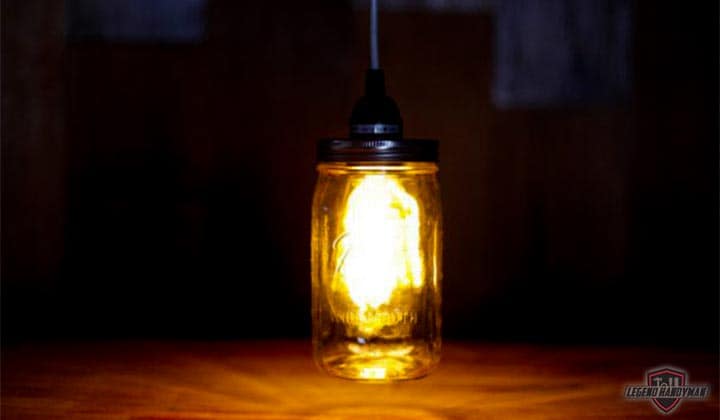
We all keep mason jars in our kitchen. You can turn your old mason jars into gorgeous pendant lights by following some easier steps that I am going to discuss.
You need the following 8 materials for Mason jar pendant light project:
- Mason Jar
- Pendant light
- Nail
- Hammer
- Pliers
- Tin snips
- Pen or marker
- Light Socket
We have used wide mouth Mason jar and Edison bulb for this project.
How to Turn Mason Jars into pendant Lights?
Step 1: Draw a Circle
Firstly you have to trace a circle and to get a good measurement of the radius of the circle we recommend to use the socket of the light as a helping tool.
Setting the socket on the top of the lid to draw a circle using the pen or marker. We have drawn our circle at the middle position of the lid.
Step 2: Punch along the Circle and Make a Hole
Pick up some nails and any type of hammer and start punching the nails along the edge of the drawn circle. It is an easy way to make a hole in the lid of a Mason jar.
Step 3: Add Some Tiny Holes as Ventilator
If there is no flow of air the jar will get hotter gradually and it may crack down. You can solve this problem by adding some tiny holes in the lid. These holes will work as a ventilator. You can create these tiny holes by tapping the nails into the top portion of the jar.
Step 4: Remove the Centre of the Lid
Grab the tin snip or the scissors and start cutting to remove the center portion of the lid. A common problem we usually face in this step is poking some sharp edge upward.
To resolve this problem bent the edges down and in with the help of the pliers. This will add some extra room to fit the socket through.
Step 5: Push the Light Bulb through the Hole
Now it is time to push the light bulb along with the rim through the hole you made recently. To tighten it screws with the rim that has come with the pendant light.
Step 6: Screw the Light Bulb
Screw the light bulb and carefully place it inside the Mason jar. Then find a suitable place in your home to hang it where it will look most beautiful.
2. Turn the Cardboard Boxes into Decorative Storage Boxes
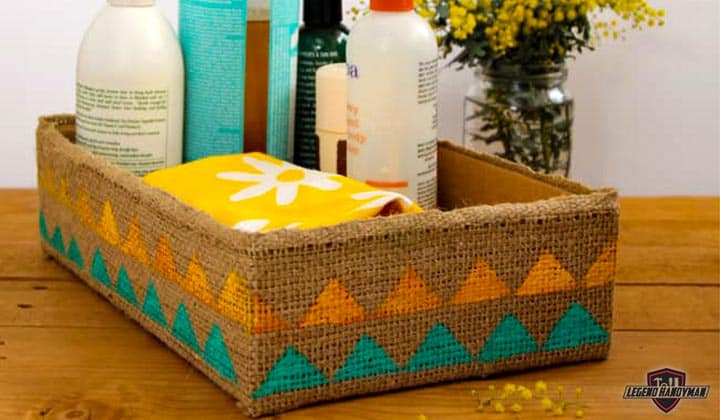
If there are cardboard boxes in your home do not throw those boxes away instead of making decorative storage boxes with those. This project does not need any special tool or material to buy. All things that need for this project simply remain in our home which includes:
- cardboard boxes
- Fabric
- Glue
- Acrylic paints or craft paints
- Scotch tape and duct tape
We have used burlap as fabric. You can use any other fabric according to your choice. The acrylic paints or craft paints, scotch tape, and duct tape are for decorative purpose.
How to Make Decorative Boxes from Card Boxes?
Step 1: Cutting the Lid of the Card Box
Firstly you have to cut the lid of the card box and push the cutting parts inside against the 4 sides.
Step 2: Cutting and Gluing the Burlap
Take measurement of the dimension of the side of the box and cut a strip of burlap that is bigger than the side of the box. Then glue it to the first side panel press and smooth out before starting on the next side.
Rotate the box as you wrap each side with the burlap. You can use clips to hold the burlap in place while gluing. When wrapping the 4 sides with the burlap is completed snip the burlap, fold it and glue the edges to the bottom. Then keep it in rest so that the glue dries.
Step 3: Decoration
The work is done and now it is time for decoration. You can beautify your decoration box using acrylic paint or craft paint, scotch tape, and duct tape. You can design anything according to your wish on this box.
3. Turn the Coffee can into Planter Bucket
If you are a big coffee drinker and have some empty coffee can in your home do not throw those cans away, instead turn those into planter bucket and beautify your home. The following tools are required to convert your coffee can into planter bucket:
- Empty coffee can
- Dish soap, razor blade or hard scrubbing
- Paint
- Drill bit / drill bit for wood is enough to make a hole in coffee can
- Rope
- Hot glue gun and glue stick. you may love pink hot glue guns
- Clothesline rope and seashell necklace (for decorative purpose)
How to Turn the Coffee can into Planter Bucket?
Step 1: Removing the Label
With the help of some dish soap, razor blade or hard scrubbing you can remove the peel off the label that leaves a sticky residue behind.
Step 2: Clean the Can
The next step is to clean the can and dry it.
Step 3: Painting
Now it is time to paint the can. You can do it using a brush or you can use spray paint. Spray painting is better than painting with a brush since it is easier to make a flawless and uniform painting using spray paint.
Either if you have HVLP spray gun, you could use that.
Step 4: Drilling
If you want to hang the planter bucket you have to drill it to enter rope through the hole, otherwise, you do not have to drill the can.
Step 5: Decorating
You can decorate your planter bucket using some clothesline rope and seashell necklaces. Using the hot glue gun you can glue the rope and shells into place.
4. Upgrade Your Bathroom’s Trash Can
The trash can is something that we often forget to upgrade or decorate. But a trash can with decorative outlook can make your bathroom more beautiful.
The idea I am going to share with you about upgrading the trash can of your bathroom will not take more than an hour. You need the following materials for this project:
- Rope
- Hot glue gun and glue stick
How to Upgrade the Trash Can of Your Bathroom?
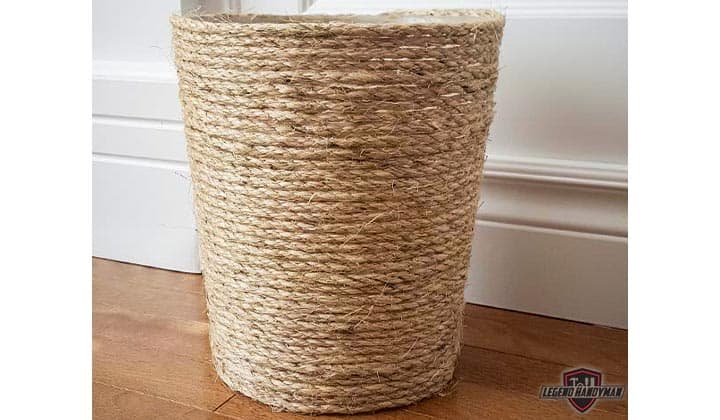
This project needs only one step. Start adding hot glue from the bottom to the top of the trash can and at the same time start wrapping the trash can with the rope. When the whole can is wrapped with the rope the work is done. You can add one or two small sized paper flower for more beautifying the trash can.
5.Upgrade Your Lampshade
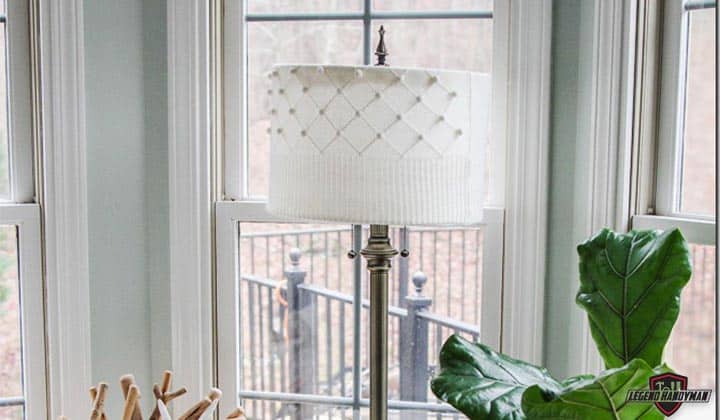
You can upgrade your lampshade in many ways. The idea I am going to share about upgrading lampshade requires nothing but a cozy cable-knit sweater of white color. If you have one in your collection you can start this project.
How to Upgrade Your Lampshade?
Step 1: Pull Down the Sweater over the Lampshade
Like you put a pillowcase over an overstuffed pillow pull the sweater down over the top of the shade. If it is a little bit tight it will be easier for you to fit it snugly around the shade.
Step 2: Cutting and Gluing
If your sweater is larger than your lampshade cut the extra part of it to fit properly with the lampshade and finally glue it down the seam. And the work is done.
6. Upgrade Your Laundry Room Light
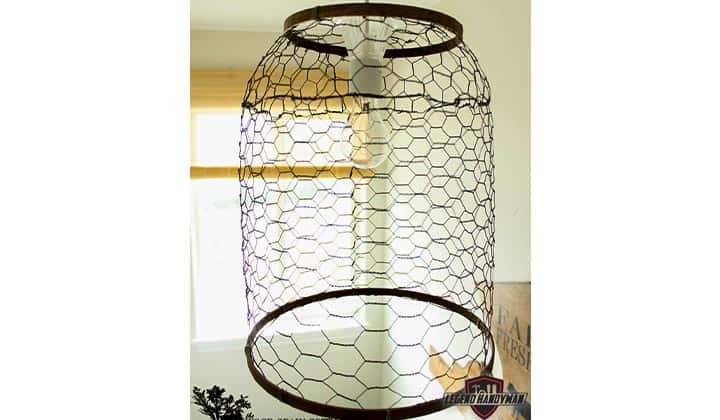
To make the light of your laundry room unique with farmhouse style look you can decorate it with chicken wire. You need the following supplies for this project:
- 12″ and 6″ Embroidery Hoop
- Chicken Wire
- Metal Snips
- The stain of your favorite color
- Stain
- Sharpie
- 12″ Lampshade
- Wire Hanger
How to Upgrade Your Laundry Room Light?
Step 1: Stain the Embroidery Hoops
Take both the embroidery hoops and stain those. Give some time to dry the stain.
Step 2: Measure the Diameter of the Light Fixture
Roll out the Chicken Wire of the 12” embroidery hoop to determine the diameter of the light fixture. After taking the measurement use your metal snip to cut the wire.
Step 3: Determine the Size of the Top of the Light Fixture
Start shaping the wire to fit it with the embroidery hoop and also wrap the loose chicken wire together. Then tied the sides together and pick out the height. If there is any excess wire cut it with your wire snip. You can use a 12-inch lampshade as a guide to determine the size for the top of the light fixture.
After determining the size of the top of the light fixture attaches the two pieces together with the loose wire.
Step 4: Determine the Height of the Top of the Light Fixture
You can use a 6-inch embroidery hoop and push it over the top of the wire to determine the height for the top of the light fixture. Take your sharpie and mark the areas you need to cut and cut the excess wire after that.
Step 5: Determine the Opening of the Top
To determine the opening of the top you can use existing light to snip a hole that will fit the light bulb you are going to use. Now the shape of the light fixture is completed
Step 6: Painting
Suspend the light fixture from a wire hanger and coat it using spray paint.
Step 7: Add the Stained Embroidery Hoop
The embroidery hoops you have stained at the earlier stage of the process, add those on both sides of the light fixture and finally, your light fixture is ready.
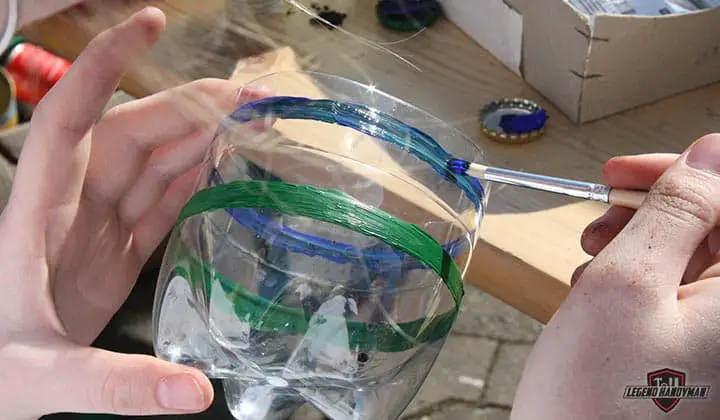
7. Pen Holder from Plastic Bottles
Bottles are great to reuse and that is why every time I find some plastic bottles in my home instead of throwing it away I think what useful works I can do from this plastic bottle.
I was needed a pen holder to buy. Yes, there are so many stylish and beautiful pen holders available in the market but you know whenever you make something by your own hand it gives you immense pleasure that an expensive pen holder cannot give you.
I found some plastic bottles available in my home. Two of those were not so strong but the rest was enough strong and sturdy. So I decided to work with that plastic bottle.
To make a pen holder from the plastic bottle you need the following tools:
- Strong plastic bottle
- Sharp Knife
- Glue
- Paper or rope or fabric for decorative purpose
How to Make Pen Holder from Plastic Bottles?
Step 1: Remove the Label
At first, remove the tags and labels from the bottle and clean it and after that make it dry if it is wet.
Step 2: Cut the Upper Part of the Bottle
Take the knife and cut the upper part of the bottle to make its mouth wide enough for holding pens.
Step 3: Decoration
You can decorate your pen holder as you want. I had glued the holder and wrapped it with fabric and add two little paper flower on it. And the project is done. It will not take more than half an hour to complete.
Wrap Up
Upcycling is fun and a good kind of recreation. It increases your renovation power. Let me give you a tip about upcycling. You can find numerous ideas on the internet about upcycling and if you just copy those ideas there will be no uniqueness of your thoughts.
If you are learning upcycling now and have not become the expert yet I would suggest you gather several ideas and combining two or more of those make your own unique project.

I'm Joost Nusselder, the founder of Tools Doctor, content marketer, and dad. I love trying out new equipment, and together with my team I've been creating in-depth blog articles since 2016 to help loyal readers with tools & crafting tips.